顯示具有 android 標籤的文章。 顯示所有文章

2022年2月13日 星期日

實戰Flutter程式開發 - Roulette Wheel Selection

        輪盤賭選擇 ( Roulette Wheel Selection ) 策略是最基本的選擇策略之一,在群體中的個體被選中的概率與個體相應的適應度函式的值成正比,且此選擇方式常出現在賭場,而此範例程式主要是藉由下列三個部份來實作類似輪盤賭選擇 ( Roulette Wheel Selection )的功能。

  1.   繪製輪盤與指針畫面   
  2.   建立隨機的指針旋轉動畫                       
  3.   動態顯示選擇結果


1.   繪製輪盤與指針畫面

        主要是藉由繼承 (extends) CustomePainter 類別建立新的類別並透過 Canvas 內部封裝繪製圖形的 API 分別建立指針與輪盤組件。


1-1.  建立指針組件      

        在繪製指針前先使用畫布 (Canvas) 所提供的旋轉 (rotate) API 調整角度後;接著再使用 Path 類別來繪製指針的形狀,由於指針底部是圓弧的形狀因此在使用畫弧 (arcTo) API 時需要建立矩形 (Rect)物件用來定義所畫的圓弧範圍並使用 Paint 類別將繪製指針進行漸層式的顏色渲染。

class DrawPointer extends CustomPainter {
  ...
  @override
  void paint(Canvas canvas, Size size) {

    // 1. Set the starting position of the drawing graphics on the canvas.
    centerOffst = Offset(size.width / 2, size.height / 2);
    canvas.translate(centerOffst.dx, centerOffst.dy);

    // 2. The angle by which the pointer is rotated before drawing.     canvas.rotate(getRadianFromAngle(angle));

    // 3. Crate a rectangle object to define the range of the drawing arc.
    centerSize = Size(size.width / 10, size.height / 5);
    var rect = Rect.fromLTWH(0 - centerSize.width / 2, 0 - centerSize.width / 2, centerSize.width, centerSize.width);
  
    // 4. Use Path object and Paint object to draw the shape and color of pointer
    canvas.drawPath(
      Path()
        ..arcTo(rect, getRadianFromAngle(30), getRadianFromAngle(300), false)
        ..relativeLineTo(centerSize.height, centerSize.width / 30)
        ..relativeLineTo(0, - 10 * centerSize.width / 30)
        ..relativeLineTo( centerSize.width, 17 * centerSize.width / 30)
        ..relativeLineTo(-centerSize.width, 17 * centerSize.width / 30 )
        ..relativeLineTo(0, -10 * centerSize.width / 30)
        ..close(),
      Paint()
        ..isAntiAlias = true
        ..style = PaintingStyle.fill
        ..shader = LinearGradient(
          begin: Alignment.bottomRight,
          end: Alignment.topLeft,
          colors: [Colors.blueGrey.withAlpha(200), Colors.cyan.withAlpha(200)],
          tileMode: TileMode.mirror,
        ).createShader(rect),
    );
    canvas.drawCircle(Offset.zero,
          centerSize.width * 0.2,
          Paint()
            ..color=Colors.black
            ..style = PaintingStyle.fill
        );

    canvas.drawCircle(Offset.zero,
          centerSize.width * 0.15,
          Paint()
            ..color=Colors.red
            ..style = PaintingStyle.fill
        );   
  }
}


1-2.  建立輪盤組件 

1-2.1.  根據項目比例繪製扇形圖  

        在繪製輪盤前先使用建立矩形 (Rect)物件用來定義所畫圓的範圍與畫布(Canvas) 中的位置後再依據每個項目比例使用畫布 (Canvas) 所提供繪製圓弧 (drawArc) 的API繪製等比例的扇形使用 Paint 類別進行項目顏色的渲染;另外為了將各項目名稱放置相對應扇形圖的中間位置,因此在繪製扇形圖時利用串列 (List) 類別來儲存繪製扇形的起始弧度與掃角弧度。

void drawRouletteWheel(Canvas canvas, Size size) {

  double startAngle = 0, sweepAngle = 0;

  // 1. Create a rectagle object to define the range and positio of the drawing pie chart.
  Rect rect = Offset(wheelRectStartPointX, wheelRectStartPointY) & Size(diameter, diameter);
  for(int repeat = 0; repeat < itemRepeat; repeat++){
    itemPercent.keys.toList().forEach((element) {
      defaultPaint.color = itemColor.containsKey(element) ? itemColor[element]!:Colors.white;

      // 2. Draw an equal-scale pie chart according to the project scale.
      sweepAngle = 360 * itemPercent[element]! / itemRepeat;
      canvas.drawArc(rect, getRadianFromAngle(startAngle), getRadianFromAngle(sweepAngle), true, defaultPaint);
      // 3. Use List class to store the start and the end radian of each sector.
      disPercent.add(WheelTextPosition(
        title:element,
        startRadian:getRadianFromAngle(startAngle),
        endRadian:getRadianFromAngle(sweepAngle)
      )); 
      startAngle = startAngle + sweepAngle;
     
    });
  }
}


1-2.2. 根據扇形的位置繪製項目名稱

        由於每個項目文字列印長度與相應扇形的弧長並非相同,因此根據計算項目文字所需的弧長與相應扇形圖的弧長之間的差值來調整項目字串列印的起始位置與角度後,再依序將項目文字中的每個字元依序列印到指定的位置中;另外文字的起始角度為90度,因此在計算列印文字的弧度後需要再加上90度的弧度才是實際字元列印的位置與角度。

void drawWheelText(Canvas canvas, List<WheelTextPosition> disText){
  
  // 1. Set the starting position of the title at an angle of 0 degrees.
  canvas.translate(wheelRectStartPointX + radius , wheelRectStartPointY + radius);

  double radian = 0.0;
  for (var element in disText) {

    // 2. calculate the starting radian of the title on the side of the wheel
    radian = calculateStartRadianForString(element);

    // 3. Add the calculated radian by 90 degrees
    radian += textRotateRadian;

    for (int i = 0; i< element.title.length; i++){
      canvas.save();
      
      // 4. Rotate each character of the title in order according to the starting radian.
      radian = drawWheelCharWithAngle(canvas, element.title[i], radian, lastradian );
     
      canvas.restore();
    }
  }
}


       藉由 TextPainter 類別取得列印字串所需的長度並除以半徑得到 sin θ後再使用 asin 函式轉換成弧度。

double calculateStartRadianForString( WheelTextPosition whellText ) {
  // 1. Generate title length.
  var _textPainter = TextPainter(
        textDirection: TextDirection.ltr,
        text: TextSpan(text: whellText.title, style:textStyle,),
      );
  _textPainter.layout(minWidth: 0, maxWidth: double.maxFinite);
  // 2. Caculate arc length based on ratio of title to raidus.
  double stringWidthForRadian = math.asin( _textPainter.width / raduis);
  return whellText.startRadian + (whellText.sweepRadian - stringWidthForRadian) / 2 ;
}


        藉由 TextPainter 類別取得列印字元所需的高度並加上半徑後作為列印字元的長度並搭配 sin 和cos 函式計算其列印字元的座標。另外使用TextPainter 類別取得列印字串所需的長度並除以半徑得到 sin θ 後再使用 asin 函式轉換成弧度。

double drawWheelCharWithAngle(Canvas canvas, String disChar, double curRadian){
 
  // 1. Generate character length.
  var _textPainter = TextPainter(
    textDirection: TextDirection.ltr,
    text: TextSpan(text: disChar, style:textStyle,),
  );
  _textPainter.layout(minWidth: 0, maxWidth: double.maxFinite);

  // 2. Calculate character print position.
  double radiusWithHeight = radius +_textPainter.height;
  double shiftPointX = radiusWithHeight * math.sin(curRadian); // sin(90):1
  double shiftPointY = radiusWithHeight * math.cos(curRadian) ; // cos(90):0

  // 3. adjust the print starting position of the canvas.
  canvas.translate(shiftPointX, -shiftPointY);

  // 4. Caculate radian based on ratio of character to raidus.
  curRadian = (curRadian + math.asin( _textPainter.width / radius));
  
  // 5. Rotate the canvas by arc
  canvas.rotate(curRadian);

  _textPainter.paint(canvas, Offset.zero);
  return curRadian;

}


2.  建立隨機的指針旋轉動畫   

        為了讓指針組件能夠產生旋轉的動畫,因此需要建立可變組件 (State fullWidget) 並混入 (with) TickerProviderStateMixin 類別來建立包含計時器 (TickerProvider) 的可變狀態組件並運用 AnimationController 類別進行動畫控制及使用 CurvedAnimation 與 Tween 類別來定義旋轉動畫的行為;最後使用 Gesture Detector 類別來接收使用者點擊畫面中的位置並判斷點擊位置是否在指針的圓弧位置。

class _WheelPointerState extends State<WheelPointerWidget> with TickerProviderStateMixin {
  Animation<double>? _animation;
  AnimationController? _controller;
  Tween<double>? _rotationTween;
  int pos = 0;
  bool isSelection = false;
  @override
  void initState() {
    super.initState();
    _controller = AnimationController(vsync: this, duration: widget.duration);
    _animation = CurvedAnimation(parent: _controller!, curve: Curves.fastLinearToSlowEaseIn);
    _rotationTween = Tween<double>(begin: 0, end: 0);
    _animation = _rotationTween!.animate(_animation!)
      ..addListener(() {
        setState(() {});
      })
      ..addStatusListener((status) {
        if (status == AnimationStatus.completed){
          isSelection = false;          
          // 1. Notify of selected radians when animation is done.
          widget.notifyCallbackFunc(isSelection, getRadianFromAngle(pos.toDouble()));
      }
    });
  }
  @override
  void didUpdateWidget (WheelPointerWidget oldWidget){
    super.didUpdateWidget(oldWidget);
    _controller!.duration = widget.duration;
  }

  @override
  void dispose() {
    _controller!.dispose();
    super.dispose();
  }
  void startAnimation() {
    isSelection = true;
    widget.notifyCallbackFunc(isSelection, 0);
    _controller!.reset();
    // 2. Set the last end of angle as the current starting angle.
    _rotationTween!.begin = pos.toDouble();
    // 3. Generate a random angle from 0 to 360 degrees.
    pos = math.Random().nextInt(360);
    // 4. Multiply the preset number of rotations by 360 plus a random value.
    _rotationTween!.end = widget.numberOfRevolutions * 360.0 + pos;
    // 5. Starts running this animation forward
    _controller!.forward();
  }

  @override
  Widget build(BuildContext context) {
    var drawPointer = DrawPointer(_animation!.value);
    return GestureDetector(
      child: CustomPaint(
        size: widget.canvasSize,
        painter: drawPointer
      ),
      onTapDown: (tapDownDetails) {
        // 6. if the animations has been completed and determine the click position.
        if(!isSelection && drawPointer.isclick(tapDownDetails.localPosition)){
          startAnimation();
        }
      },
    );
  }
}


3.  動態顯示選擇結果

        最後在指針動畫結束時需要依據指針的角度換算成弧度並以此確認選擇項目後顯示項目名稱,但由於完成上述行為需要將各組件態進行跨組件因此可使用 provider 套件來簡化實作流程。


3-1.  建立跨組件的共享數據類別

       首先建立一個可保存跨組件的共享數據類別,此類別是藉由繼承 (extends) InheritedWidget 類別而建立的 ShareDataInheritedWidget 類別,目的是實踐一個可由上至下的共享數據物件且由於具體保存數據類型不可預期,為了通用性則使用泛型的方式來定義此類別。

// 1. Build a generic InheritedWidget to hold state that needs to be shared across components.
class ShareDataInheritedWidget<T> extends InheritedWidget {
  const ShareDataInheritedWidget({
        Key? key,
        required this.prvObj,
        required Widget child
  }) : super(key: key, child: child);

  final T prvObj;

  // 2. Define a convenience method to facilitate the widgets in the subtree to obtain shared data.
  static ShareDataInheritedWidget? of<T>(BuildContext context){
    final ShareDataInheritedWidget? inheritedObj = context.dependOnInheritedWidgetOfExactType<ShareDataInheritedWidget<T>>();
    assert(inheritedObj != null, "No this object found in context!");
    return inheritedObj;
  }

  @override
  bool updateShouldNotify(ShareDataInheritedWidget<T> oldWidget) {
    // 3. This callback determines whether to notify the datadependent widgets in the subtree to rebuild when the data changes.
    return prvObj != oldWidget.prvObj;
  }
}


3-2.  建立跨組件的事件通知類別

        由於數據發生變化的時候需要重新建構 ShareDataInherited Widget 類別因此需要建立一個共享狀態的類別,此類別是藉由繼承 (extends) ChangeNotifier 類別而建立的 ChangeDataNotifier 類別,其目的是在共享狀態變更時能使用notifyListeners函數來通知註冊此事件的 ShareDataInherited Widget 類別進而實踐跨組件 (Widget) 的事件通知行為且由於具體回傳函數類型不可預期,為了通用性則使用泛型的方式來定義此類別。 

class ChangeDataNotify<T> extends ChangeNotifier {  
  ChangeDataNotify(this.hookData);
  late T hookData;

  void changeDataFunc(T changeData ){
    hookData = changeData;
    // 1. Notify the listeners to rebuild the update state of the InheritedWidget.
    notifyListeners();
  }

  T getDataFunc(){
    return hookData;
  }
}


3-3.  建立 RouletteWheelWidget 組件

        使用前述的類別分別建立 DisplayTitleWidget 組件並搭配使用Consumer 組件用來即時顯示選擇項目和藉由整合輪盤組件和指針組件並搭配使用 provider 套件中的Provider.of 組件用來實現選擇項目更新的即時通知,最後整合建立 RouletteWheelWidget 組件。

class DisplayTitleWidget extends StatelessWidget {
  const DisplayTitleWidget ({Key? key}):super(key: key);
  @override
  Widget build(BuildContext context) {
    // 1. ChangeDataNotify is provided to widgets in our app through the ChangeNotifierProvider declaration at the top.
    return Consumer<ChangeDataNotify<String>>(
      builder: (context, obj, child) {
        // 2. Use ChangeDataNotify widget here, without rebuilding every time.
        return Text(obj.getDataFunc(),
          style: const TextStyle(
            color: Colors.brown,
            fontSize: 24,
            fontWeight: FontWeight.normal,
            fontStyle: FontStyle.normal,
            decoration: TextDecoration.none,
          ),
        );
      }
    );
  }
}
class RouletteWheelWidget extends StatefulWidget {
  const RouletteWheelWidget({
    Key? key,
    required this.radius,
    required this.textStyle,
    required this.itemRepeat,
    required this.itemPercent,
    required this.itemColor,
  }) : super(key: key);

  final double radius;
  final TextStyle textStyle;
  final int itemRepeat;
  final Map<String, double> itemPercent;
  final Map<String, Color> itemColor;

  @override
  State<RouletteWheelWidget> createState() => _RouletteWheelState();
}
class _RouletteWheelState extends State<RouletteWheelWidget> {
  // 1. Create uniquely identify elements for access by other object associated with elements.
  final GlobalKey <WheelWidgetState> _wheelWidgetKey = GlobalKey();
  WheelWidget? wheelWidget;
  String title = "未知";

  void notifyResultFunc(bool isSelection ,double radian) {
    title = isSelection ? "選擇中" : _wheelWidgetKey.currentState!.getTitleFromRadian(radian);
    // 2. Use Provider.of with the listen parameter set to false without rebuild ChangeDataNotify<String> wedget.
    Provider.of<ChangeDataNotify<String>>(context, listen: false).changeDataFunc(title);
  }

  @override
  Widget build(BuildContext context) {
    wheelWidget ??= WheelWidget (
          key: _wheelWidgetKey,
          radius: widget.radius,
          canvasSize: Size(widget.radius*2, widget.radius*2),
          itemRepeat: widget.itemRepeat,
          itemPercent: widget.itemPercent,
          itemColor: widget.itemColor,
          textStyle: widget.textStyle,
    );

    return Column(
          mainAxisAlignment: MainAxisAlignment.center,
          mainAxisSize: MainAxisSize.min,
          children:[
            // 3. Use ShareDataInheritedWidget<String> to share title with DisplayTitleWidget widget.
            ShareDataInheritedWidget<String>(
              prvObj: title,
              child: const DisplayTitleWidget(),
            ),
            SizedBox(
              height: widget.textStyle.fontSize! * 2,
            ),
            Stack (
              children:[
                wheelWidget!,
                WheelPointerWidget(
                  canvasSize: Size(widget.radius * 2, widget.radius * 2),
                  numberOfRevolutions: 3,
                  duration: const Duration(seconds: 7),
                  notifyCallbackFunc:notifyResultFunc,
              ]
          ),
        ]
    );
  }
}


4.  各平台的執行結果

        整合使用 provider 套件中的 ChangeNotifierProvider 組件將RouletteWheelWidget 組件與ChangeDataNotify 組件作為參數後建立RoulettWheelSelectionApp 組件在各不同的平台進行實測。

void main() => runApp(const RoulettWheelSelectionApp());

class RoulettWheelSelectionApp extends StatelessWidget {
  const RoulettWheelSelectionApp({Key? key}):super(key: key);
  @override
  Widget build (BuildContext context) {
    return MaterialApp(
      home: Scaffold(
        body: Center(
          // 1. Use ChangeNotifierProvider widget of provider package to provides an instance of a ChangeNotifier.
          child: ChangeNotifierProvider(
            // 2. Create ChangeDataNotify class to keep private state.
            create: (context) => ChangeDataNotify<String>("未選擇"),
            // 3. Initialize RouletteWheelWidget class
            child:const RouletteWheelWidget(
              radius: 150,
              textStyle: TextStyle(
                fontSize: 20,
                fontWeight: FontWeight.bold,
                color: Colors.black45
              ),
              itemRepeat: 2,
              itemPercent: {"第一項":0.4, "第二項":0.3,"第三項": 0.2, "第四項":0.1},
              itemColor: {"第一項":Colors.green, "第二項":Colors.yellow ,"第三項": Colors.red, "第四項":Colors.brown},
            ),
          ),
        ),
      ),
    );
  }
}

4-1.  Windows Desktop


4-2.  Chrome Web


4-3.  Linux APP (Ubuntu)


4-4.  Android APP


2022年1月24日 星期一

Flutter 模組(Module) 專案範例(Android)

         Flutter  的模組 (Module) 專案範例提供建立模組(Module)的專案架構,此專案將Flutter的程式打包成模組並使用 Flutter Engine API 啟動並維持 FlutterActivity 或 FlutterFragment的獨立 Flutter 環境讓Android 或 iOS 的應用程式使用。


1.  建立新的Flutter專案

1-1.  開啟命令介面 


1-2.  選擇建立插件(Plugin) 專案類型 

1-3.  輸入專案名稱


2.  Flutter 預設模組專案的檔案架構

在選擇建立新的模組專案後會自動產生相關的檔案及目錄,主要的檔案如下:

2-1.  lib 目錄

      主要存放開發程式碼的目錄,而此範例中只提供一個簡單的範例程式檔案 

1.  main.dart

        此程式只是一個最基本的Material App的應用程式,只有顯示文字與浮動按鍵兩個互動介面。

import 'package:flutter/material.dart';

void main() => runApp(const MyApp());

class MyApp extends StatelessWidget {
  const MyApp({Key? key}) : super(key: key);
  @override
  Widget build(BuildContext context) {
    return MaterialApp(
      title: 'Flutter Demo',
      theme: ThemeData(
        primarySwatch: Colors.blue,
      ),
      home: const MyHomePage(title: 'Flutter Demo Home Page'),
    );
  }
}

class MyHomePage extends StatefulWidget {
  const MyHomePage({Key? key, required this.title}) : super(key: key);
  final String title;

  @override
  State<MyHomePage> createState() => _MyHomePageState();
}

class _MyHomePageState extends State<MyHomePage> {
  int _counter = 0;
  void _incrementCounter() {
    setState(() {
  _counter++;
    });
  }

  @override
  Widget build(BuildContext context) {
    return Scaffold(
      appBar: AppBar(
        title: Text(widget.title),
      ),
      body: Center(
        child: Column(
          mainAxisAlignment: MainAxisAlignment.center,
          children: <Widget>[
            const Text(
              'You have pushed the button this many times:',
            ),
            Text(
              '$_counter',
              style: Theme.of(context).textTheme.headline4,
            ),
          ],
        ),
      ),
      floatingActionButton: FloatingActionButton(
        onPressed: _incrementCounter,
        tooltip: 'Increment',
        child: const Icon(Icons.add),
      ),
    );
  }
}   


2-2.  test 目錄    

        主要存放使用Flutter中WidgetTester的測試程序對指定Widget物件進行互動驗證程式,此範例專案提供一個測試範例:

1.     widget_test.dart

        測試自訂MaterialApp在建立時介面是否包含有0的字串和沒有1的字串,若不是則會在執行時產生例外,若是則觸發 add icon 的tap並最後確認其介面是否包含有1的字串和沒有0的字串,若不是則會在執行時產生例外。

import 'package:flutter/material.dart';
import 'package:flutter_test/flutter_test.dart';
import 'package:flutter_application/main.dart';

void main() {

  testWidgets('Counter increments smoke test', (WidgetTester tester) async {
    // Build our app and trigger a frame.
    await tester.pumpWidget(const MyApp());

    // Verify that our counter starts at 0.
    expect(find.text('0'), findsOneWidget);
    expect(find.text('1'), findsNothing);

    // Tap the '+' icon and trigger a frame.
    await tester.tap(find.byIcon(Icons.add));
    await tester.pump();

    // Verify that our counter has incremented.
    expect(find.text('0'), findsNothing);
    expect(find.text('1'), findsOneWidget);
  });
}  


2-3.  .android 目錄

        主要存放編譯 android 專案所需要的檔案,而與其他類型的Flutter 範例專案不同的部份在於將應用程式與載入模組的程式分開成兩個不同目錄(app, Flutter)且各自包含專屬的 AndroidManifest.xml 以便於可以共同編譯成 apk 檔案直接在模擬器、實機上執行或單獨編譯成 aar 檔案提供給其他android 專案載入使用。


2-4.  pubspec.yaml檔案

        Flutter 專案中的檔案配置檔,除了設定基本專案資訊並可設定專案中 使用到的相依類別庫或外部資源,而模組 (Module) 專案需要另外設定專門的相關參數。

name: flutter_module
description: A new flutter module project.

environment:
  sdk: ">=2.15.1 <3.0.0"

dependencies:
  flutter:
    sdk: flutter

  cupertino_icons: ^1.0.2

dev_dependencies:
  flutter_test:
    sdk: flutter
  flutter_lints: ^1.0.0

flutter:
  uses-material-design: true

module:
  androidX: true
  androidPackage: com.example.flutter_module
  iosBundleIdentifier: com.example.flutterModule   


2-5.  .packages檔案

        Flutter 專案中設定相依類別庫檔案路徑的組態檔,建立專案的預設檔案路徑為 flutter_module:lib/ 而此檔案是在執行"flutter pub get"指令後根據 pubspec.yaml中的內容產生出來,設定引用類別庫格式為【路徑別名:實際路徑】。

async:file:///D:/flutter_windows_2.8.1-stable/flutter/.pub-cache/hosted/pub.dartlang.org/async-2.8.2/lib/
boolean_selector:file:///D:/flutter_windows_2.8.1-stable/flutter/.pub-cache/hosted/pub.dartlang.org/boolean_selector-2.1.0/lib/
characters:file:///D:/flutter_windows_2.8.1-stable/flutter/.pub-cache/hosted/pub.dartlang.org/characters-1.2.0/lib/
charcode:file:///D:/flutter_windows_2.8.1-stable/flutter/.pub-cache/hosted/pub.dartlang.org/charcode-1.3.1/lib/
clock:file:///D:/flutter_windows_2.8.1-stable/flutter/.pub-cache/hosted/pub.dartlang.org/clock-1.1.0/lib/
collection:file:///D:/flutter_windows_2.8.1-stable/flutter/.pub-cache/hosted/pub.dartlang.org/collection-1.15.0/lib/
cupertino_icons:file:///D:/flutter_windows_2.8.1-stable/flutter/.pub-cache/hosted/pub.dartlang.org/cupertino_icons-1.0.4/lib/
fake_async:file:///D:/flutter_windows_2.8.1-stable/flutter/.pub-cache/hosted/pub.dartlang.org/fake_async-1.2.0/lib/
flutter:file:///D:/flutter_windows_2.8.1-stable/flutter/packages/flutter/lib/
flutter_lints:file:///D:/flutter_windows_2.8.1-stable/flutter/.pub-cache/hosted/pub.dartlang.org/flutter_lints-1.0.4/lib/
flutter_test:file:///D:/flutter_windows_2.8.1-stable/flutter/packages/flutter_test/lib/
lints:file:///D:/flutter_windows_2.8.1-stable/flutter/.pub-cache/hosted/pub.dartlang.org/lints-1.0.1/lib/
matcher:file:///D:/flutter_windows_2.8.1-stable/flutter/.pub-cache/hosted/pub.dartlang.org/matcher-0.12.11/lib/
meta:file:///D:/flutter_windows_2.8.1-stable/flutter/.pub-cache/hosted/pub.dartlang.org/meta-1.7.0/lib/
path:file:///D:/flutter_windows_2.8.1-stable/flutter/.pub-cache/hosted/pub.dartlang.org/path-1.8.0/lib/
sky_engine:file:///D:/flutter_windows_2.8.1-stable/flutter/bin/cache/pkg/sky_engine/lib/
source_span:file:///D:/flutter_windows_2.8.1-stable/flutter/.pub-cache/hosted/pub.dartlang.org/source_span-1.8.1/lib/
stack_trace:file:///D:/flutter_windows_2.8.1-stable/flutter/.pub-cache/hosted/pub.dartlang.org/stack_trace-1.10.0/lib/
stream_channel:file:///D:/flutter_windows_2.8.1-stable/flutter/.pub-cache/hosted/pub.dartlang.org/stream_channel-2.1.0/lib/
string_scanner:file:///D:/flutter_windows_2.8.1-stable/flutter/.pub-cache/hosted/pub.dartlang.org/string_scanner-1.1.0/lib/
term_glyph:file:///D:/flutter_windows_2.8.1-stable/flutter/.pub-cache/hosted/pub.dartlang.org/term_glyph-1.2.0/lib/
test_api:file:///D:/flutter_windows_2.8.1-stable/flutter/.pub-cache/hosted/pub.dartlang.org/test_api-0.4.3/lib/
typed_data:file:///D:/flutter_windows_2.8.1-stable/flutter/.pub-cache/hosted/pub.dartlang.org/typed_data-1.3.0/lib/
vector_math:file:///D:/flutter_windows_2.8.1-stable/flutter/.pub-cache/hosted/pub.dartlang.org/vector_math-2.1.1/lib/
flutter_module:lib/


3.  Android 專案導入Flutter模組(Module)流程

3-1.   載入Fluter模組(Module)的設定環境

1.  settings.gradle

        由於載入 Flutter 模組時需要使用Flutter.io相關的類別庫,因此編譯專案時需要設定下載 Flutter.io 相關類別庫的網址和載入自訂Flutter模組的路徑  

dependencyResolutionManagement {

	repositoriesMode.set(RepositoriesMode.FAIL_ON_PROJECT_REPOS)

	repositories {
		google()
		mavenCentral()

		String storageUrl = System.env.FLUTTER_STORAGE_BASE_URL ?: "https://storage.googleapis.com"
		maven {
			url 'C:/Users/yuanj/Desktop/flutter_module/build/host/outputs/repo'
		}
		maven {
			url "$storageUrl/download.flutter.io"
		}

		jcenter() // Warning: this repository is going to shut down soon
	}
}

rootProject.name = "My Application"
include ':app'


2.  app\build.gradle 

        Flutter將模組打包成AAR檔案時會產生三種 ( debug, release, profile ) 對應不同建置類型而載入的AAR檔案,因此需要在檔案中指定各建置類型對應的AAR檔案並且新增 profile 建置類型並使用 'iniWith' 屬性複製debug 建置類型的組態設定。


plugins {
  id 'com.android.application'
}

android {
  compileSdk 32

  defaultConfig {
    applicationId "com.example.myapplication"
    minSdk 24
    targetSdk 32
    versionCode 1
    versionName "1.0"

    testInstrumentationRunner "androidx.test.runner.AndroidJUnitRunner"
  }

  buildTypes {
    release {
      minifyEnabled false
      proguardFiles getDefaultProguardFile('proguard-android-optimize.txt'), 'proguard-rules.pro'
    }

    profile {
      initWith debug
    }
  }

  compileOptions {
    sourceCompatibility JavaVersion.VERSION_1_8
    targetCompatibility JavaVersion.VERSION_1_8
  }
}

dependencies {
  implementation 'androidx.appcompat:appcompat:1.2.0'
  implementation 'com.google.android.material:material:1.3.0'
  implementation 'androidx.constraintlayout:constraintlayout:2.0.4'
  testImplementation 'junit:junit:4.+'
  androidTestImplementation 'androidx.test.ext:junit:1.1.2'
  androidTestImplementation 'androidx.test.espresso:espresso-core:3.3.0'

  debugImplementation 'com.example.flutter_module:flutter_debug:1.0'
  profileImplementation 'com.example.flutter_module:flutter_profile:1.0'
  releaseImplementation 'com.example.flutter_module:flutter_release:1.0'
}


3.  載入 flutter 相關的資料庫

        針對相關環境設定完成後,執行Sync Project With Files的動作才會真正的載入相關的類別庫並可在Gradle視窗中檢視相關的類別庫是否正確的載入至專案中。


3-2.  設定 AndroidManifest.xml 

        Flutter 提供 FlutterActivity 用於 Android 應用程式中顯示 Flutter 的使用者介面。 和其他的 Activity 相同,要使用 FlutterActivity 必須在Android 專案的AndroidMifest. xml 文件中的application標簽中進行註冊。

<?xml version="1.0" encoding="utf-8"?>
<manifest xmlns:android="http://schemas.android.com/apk/res/android"
  xmlns:tools="http://schemas.android.com/tools"
  package="com.example.myapplication">
  <application
    android:allowBackup="true"
    android:icon="@mipmap/ic_launcher"
    android:label="@string/app_name"
    android:roundIcon="@mipmap/ic_launcher_round"
    android:supportsRtl="true"
    android:theme="@style/Theme.MyApplication">

    <activity
      android:name="io.flutter.embedding.android.FlutterActivity"
      android:configChanges="orientation|keyboardHidden|keyboard|screenSize|locale|layoutDirection|fontScale|screenLayout|density|uiMode"
      android:hardwareAccelerated="true"
      android:windowSoftInputMode="adjustResize"
    />

    <activity
      android:name=".MainActivity"
      android:exported="true"
      tools:ignore="MissingClass">
      <intent-filter>
        <action android:name="android.intent.action.MAIN" />
        <category android:name="android.intent.category.LAUNCHER" />
      </intent-filter>
    </activity>
  </application>
</manifest>


3-3.  載入 Flutter 模組

1. 使用createDefaultIntent的方式建立FlutterActivity

        此方式是以預設模組的載入點為 main 函式且預設路由("/")的方式載入 。 

import io.flutter.embedding.android.FlutterActivity;
Button deflaunchbtn = null;
protected void LaunchFlutterActivityByDefaultIntent(){
  deflaunchbtn = (Button)findViewById(R.id.deflaunchbtn);
  deflaunchbtn.setOnClickListener(new View.OnClickListener() {
    @Override
    public void onClick(View view) {
      startActivity(
        FlutterActivity.createDefaultIntent(getApplicationContext()));
    }
  });
}


2. 使用withNewEngine 方式建立FlutterActivity 

       若要自訂路由名稱則可以使用工廠方法 (Factory Method) withNewEngine 函式和將自訂路由名稱作為參數的方式建立FlutterActivity 類別 ,此方式會在FlutterActivity內部建立一個FlutterEngine實例,但會有一個明顯的初始化等待時間。

import io.flutter.embedding.android.FlutterActivity; 
Button engrutbtn= null;
protected void LaunchFlutterActivityByEngineWithRoute(){
  engrutbtn = (Button)findViewById(R.id.engrutbtn);
  engrutbtn.setOnClickListener(new View.OnClickListener() {
    @Override
    public void onClick(View view) {
      startActivity(
        FlutterActivity
          .withNewEngine()
          .initialRoute("/flutter_module_route")
          .build(getApplicationContext())
      );
    }
  });
}


3.  使用 FlutterEngine 方式建立FlutterActivity

       建立 FlutterActivity 時會同時建立自已的 FlutterEngine,但 FlutterEngine 的建置時間會導致載入時出現明顯延遲行為。因此若要減少延遲行為則必須在建立FlutterActivity前先初始化FlutterEngine並在適合的地方實例化FlutterEngine。

import io.flutter.embedding.android.FlutterActivity;
Button engchbtn= null;
protected void LaunchFlutterActivityByEngineCacheWithRoute(){
  engchbtn = (Button) findViewById(R.id.engchbtn);

  flutterEngine = new FlutterEngine(this);
  flutterEngine.getNavigationChannel().setInitialRoute("/flutter_module_route");
  flutterEngine.getDartExecutor().executeDartEntrypoint(
    DartExecutor.DartEntrypoint.createDefault()
  );
  FlutterEngineCache
        .getInstance()
        .put("flutter_module_engine_id", flutterEngine);

  engchbtn.setOnClickListener(new View.OnClickListener() {
    @Override
    public void onClick(View v) {
      startActivity(
        FlutterActivity
          .withCachedEngine("flutter_module_engine_id")
          .build(getApplicationContext())
        );
    }
  });
}


4.  執行Android應用程式


2022年1月17日 星期一

Flutter 插件 (Plugins) 專案範例

         Flutter  的插件 (Plugin) 專案範例提供建立插件(Plugin)的專案架構,而插件 ( Plugin )是一種特殊的Dart 包 (Package) 可以結合 Dart 碼和不同平台的程式語言。


1.  建立新的Flutter專案

  1-1.  開啟命令介面


  1-2.  選擇建立插件(Plugin) 專案類型

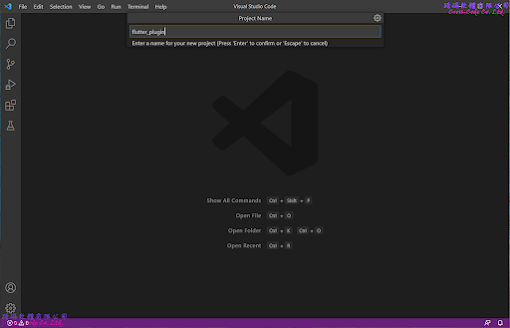
  1-3.  輸入專案名稱


2.  Flutter 預設插件專案的檔案架構

        在選擇建立新的插件專案後會自動產生相關的檔案及目錄,主要的檔案如下:

  2-1.  lib 目錄

        主要存放開發程式碼的目錄,而此範例中只提供一個簡單的範例程式檔案 。

  1.  flutter_plugin.dart  

    定義提供服務的插件(Plugin)類別,此類別主要是作為flutter 串接Dart 與執行各平台程式碼的包裝(Wrapper)程式。

import 'dart:async';
import 'package:flutter/services.dart';

class FlutterPlugin {
  static const MethodChannel _channel = MethodChannel('flutter_plugin');

  static Future<String?> get platformVersion async {
    final String? version = await _channel.invokeMethod('getPlatformVersion');
      return version;
  }
}

        2.  flutter_plugin_web.dart

     此檔案是根據pubspec.yaml和flutter_plugin.dart的內容在執行 "flutter create --template=plugin --platforms=web . " 指令產生出來且類別名稱會在原本的類別名稱上加入"Web"字串。


import 'dart:async';
import 'dart:html' as html show window;
import 'package:flutter/services.dart';
import 'package:flutter_web_plugins/flutter_web_plugins.dart';

class FlutterPluginWeb {
  static void registerWith(Registrar registrar) {
    final MethodChannel channel = MethodChannel(
      'flutter_plugin',
      const StandardMethodCodec(),
      registrar,
    );

    final pluginInstance = FlutterPluginWeb();
    channel.setMethodCallHandler(pluginInstance.handleMethodCall);
  }

  Future<dynamic> handleMethodCall(MethodCall call) async {
    switch (call.method) {
      case 'getPlatformVersion':
        return getPlatformVersion();
      default:
        throw PlatformException(
          code: 'Unimplemented',
          details: 'flutter_plugin for web doesn\'t implement \'${call.method}\'',
        );
      }
  }

  Future<String> getPlatformVersion() {
    final version = html.window.navigator.userAgent;
    return Future.value(version);
  }
}

        3.  linux 目錄

    此目錄是根據 pubspec.yaml 和 flutter_plugin.dart 的內容在執行 "flutter create --template=plugin --platforms=linux . " 指令後建立 GNU C++ 語言的類別函式來串接Dart 類別的程式。 


        4.  windows 目錄 

    此目錄是根據 pubspec.yaml 和 flutter_plugin.dart 的內容在執行 "flutter create --template=plugin --platforms=windows . " 指令後建立Visual C++ 語言的類別函式來串接 Dart 類別的程式。


        5.  android 目錄

    此目錄是根據 pubspec.yaml 和 flutter_plugin.dart 的內容在執行 "flutter create --template=plugin --platforms=android . " 指令後建立Kotlin 語言的類別函式來串接 Dart 類別的程式。


    2-2.  test 目錄

    主要存放使用Flutter提供的 test 測試函數對於類別庫(library)所提供的物件進行驗證程式。

  1.  flutter_plugin_test.dart

    測試 flutter_plugin 檔案中定義的FlutterPlugin類別是否能在不同平台上正確的執行與回傳預期資料型態。

import 'package:flutter/services.dart';
import 'package:flutter_test/flutter_test.dart';
import 'package:flutter_plugin/flutter_plugin.dart';

void main() {
  const MethodChannel channel = MethodChannel('flutter_plugin');

  TestWidgetsFlutterBinding.ensureInitialized();

  setUp(() {
    channel.setMockMethodCallHandler((MethodCall methodCall) async {
      return '42';
    });
  });

  tearDown(() {
    channel.setMockMethodCallHandler(null);
  });
  test('getPlatformVersion', () async {
    expect(await FlutterPlugin.platformVersion, '42');
  });
} 

    2-3.  pubspec.yaml檔案

    flutter 專案中的檔案配置檔,除了設定基本專案資訊並可設定專案中使用到的相依類別庫或外部資源。

name: flutter_plugin
description: A new flutter plugin project.
version: 0.0.1
homepage:

environment:
  sdk: ">=2.15.1 <3.0.0"
  flutter: ">=2.5.0"

dependencies:
  flutter:
    sdk: flutter
  flutter_web_plugins:
    sdk: flutter

dev_dependencies:
  flutter_test:
    sdk: flutter
  flutter_lints: ^1.0.0

flutter:
  plugin:
    platforms:
      windows:
        pluginClass: FlutterPlugin
      android:
        pluginClass: FlutterPlugin
        package: com.example.flutter_plugin
      web:
        pluginClass: FlutterPluginWeb
        fileName: flutter_plugin_web.dart
      linux:
        pluginClass: FlutterPlugin

    2-4.  .packages檔案

    flutter 專案中設定相依類別庫檔案路徑的組態檔,建立專案的預設檔案路徑為 flutter_plugin:lib/ 而此檔案是在執行"flutter pub get"指令後根據 pubspec.yaml中的內容產生出來,設定引用類別庫格式為【路徑別名:實際路徑】。

async:file:///D:/flutter_windows_2.8.1-stable/flutter/.pub-cache/hosted/pub.dartlang.org/async-2.8.2/lib/
boolean_selector:file:///D:/flutter_windows_2.8.1-stable/flutter/.pub-cache/hosted/pub.dartlang.org/boolean_selector-2.1.0/lib/
characters:file:///D:/flutter_windows_2.8.1-stable/flutter/.pub-cache/hosted/pub.dartlang.org/characters-1.2.0/lib/
charcode:file:///D:/flutter_windows_2.8.1-stable/flutter/.pub-cache/hosted/pub.dartlang.org/charcode-1.3.1/lib/
clock:file:///D:/flutter_windows_2.8.1-stable/flutter/.pub-cache/hosted/pub.dartlang.org/clock-1.1.0/lib/
collection:file:///D:/flutter_windows_2.8.1-stable/flutter/.pub-cache/hosted/pub.dartlang.org/collection-1.15.0/lib/
cupertino_icons:file:///D:/flutter_windows_2.8.1-stable/flutter/.pub-cache/hosted/pub.dartlang.org/cupertino_icons-1.0.4/lib/
fake_async:file:///D:/flutter_windows_2.8.1-stable/flutter/.pub-cache/hosted/pub.dartlang.org/fake_async-1.2.0/lib/
flutter:file:///D:/flutter_windows_2.8.1-stable/flutter/packages/flutter/lib/
flutter_lints:file:///D:/flutter_windows_2.8.1-stable/flutter/.pub-cache/hosted/pub.dartlang.org/flutter_lints-1.0.4/lib/
flutter_plugin:../lib/
flutter_test:file:///D:/flutter_windows_2.8.1-stable/flutter/packages/flutter_test/lib/
flutter_web_plugins:file:///D:/flutter_windows_2.8.1-stable/flutter/packages/flutter_web_plugins/lib/
js:file:///D:/flutter_windows_2.8.1-stable/flutter/.pub-cache/hosted/pub.dartlang.org/js-0.6.3/lib/
lints:file:///D:/flutter_windows_2.8.1-stable/flutter/.pub-cache/hosted/pub.dartlang.org/lints-1.0.1/lib/
matcher:file:///D:/flutter_windows_2.8.1-stable/flutter/.pub-cache/hosted/pub.dartlang.org/matcher-0.12.11/lib/
meta:file:///D:/flutter_windows_2.8.1-stable/flutter/.pub-cache/hosted/pub.dartlang.org/meta-1.7.0/lib/
path:file:///D:/flutter_windows_2.8.1-stable/flutter/.pub-cache/hosted/pub.dartlang.org/path-1.8.0/lib/
sky_engine:file:///D:/flutter_windows_2.8.1-stable/flutter/bin/cache/pkg/sky_engine/lib/
source_span:file:///D:/flutter_windows_2.8.1-stable/flutter/.pub-cache/hosted/pub.dartlang.org/source_span-1.8.1/lib/
stack_trace:file:///D:/flutter_windows_2.8.1-stable/flutter/.pub-cache/hosted/pub.dartlang.org/stack_trace-1.10.0/lib/
stream_channel:file:///D:/flutter_windows_2.8.1-stable/flutter/.pub-cache/hosted/pub.dartlang.org/stream_channel-2.1.0/lib/
string_scanner:file:///D:/flutter_windows_2.8.1-stable/flutter/.pub-cache/hosted/pub.dartlang.org/string_scanner-1.1.0/lib/
term_glyph:file:///D:/flutter_windows_2.8.1-stable/flutter/.pub-cache/hosted/pub.dartlang.org/term_glyph-1.2.0/lib/
test_api:file:///D:/flutter_windows_2.8.1-stable/flutter/.pub-cache/hosted/pub.dartlang.org/test_api-0.4.3/lib/
typed_data:file:///D:/flutter_windows_2.8.1-stable/flutter/.pub-cache/hosted/pub.dartlang.org/typed_data-1.3.0/lib/
vector_math:file:///D:/flutter_windows_2.8.1-stable/flutter/.pub-cache/hosted/pub.dartlang.org/vector_math-2.1.1/lib/
flutter_plugin_example:lib/


3.  Flutter  插件載入範例專案的檔案架構

  在選擇建立新的插件專案後會自動產生載入插件的範例應用程式檔案及目錄,主要的檔案如下:

    3-1.  example\lib 目錄

    主要存放開發程式碼的目錄,main.dart 中的 main 函式為啟動程式的入口函式,而此範例程式是說明如何載入自訂插件(Plugin)及執行自訂類別與函式的方法。

        1.  main.dart

  使用非同步的方式執行 flutter_plugin 檔案中定義 FlutterPlugin 類別的取得執行平台版本函式結果顯示於營幕上。

import 'package:flutter/material.dart';
import 'dart:async';
import 'packge:flutter/services.dart';
import 'package:flutter_plugin/flutter_plugin.dart';

void main() {
  runApp(const MyApp());
}

class MyApp extends StatefulWidget {
  const MyApp({Key? key}) : super(key: key);

  @override
  State<MyApp> createState() => _MyAppState();
}

class _MyAppState extends State<MyApp> {
  String _platformVersion = 'Unknown';

  @override
  void initState() {
    super.initState();
    initPlatformState();
  }

  Future<void> initPlatformState() async {
    String platformVersion;
    try {
      platformVersion =
        await FlutterPlugin.platformVersion ?? 'Unknown platform version';
    } on PlatformException {
      platformVersion = 'Failed to get platform version.';
    }
     
    if (!mounted) return;
      
    setState(() {
      _platformVersion = platformVersion;
    });
  }

  @override
  Widget build(BuildContext context) {
    return MaterialApp(
      home: Scaffold(
        appBar: AppBar(
          title: const Text('Plugin example app'),
        ),
        body: Center(
          child: Text('Running on: $_platformVersion\n'),
        ),
      ),
  );}
}

        2.  generated_plugin_registrant.dart

  此檔案是根據 pubspec.yaml 和 flutter_plugin.dart 的內容在執行 "flutter create --template=plugin --platforms=web . " 指令產生出來且類別名稱是根據插件 (Plugin) 的 pubspec.yaml中依據指定平台所定義的類別名稱,而且名稱必須是符合原先定義類別名稱 + "Web"字串的格式。

import 'package:flutter_plugin/flutter_plugin_web.dart';
import 'package:flutter_web_plugins/flutter_web_plugins.dart';

void registerPlugins(Registrar registrar) {
  FlutterPluginWeb.registerWith(registrar);
  registrar.registerMessageHandler();
}

    3-2.  example\test 目錄

    主要存放使用Flutter提供的 test 測試函數對於類別庫(library)所提供的物件進行驗證程式。

        1.  widget_test.dart

  使用testWidgets函式測試 flutter_plugin 檔案中定義的FlutterPlugin類別在載入後在不同的平台上執行是否會影響應用程式的執行,因此此程式只是確認在建立此應用程式後是否在介面上有產生 textWidget物件和此物件顯示的字串包含 "Running on:"。

import 'package:flutter/material.dart';
import 'package:flutter_test/flutter_test.dart';
import 'package:flutter_plugin_example/main.dart';

void main() {
  testWidgets('Verify Platform version', (WidgetTester tester) async {
  
    await tester.pumpWidget(const MyApp());

    expect(
      find.byWidgetPredicate(
        (Widget widget) => widget is Text &&
          widget.data!.startsWith('Running on:'),
      ),
      findsOneWidget,
    );
  });
}

    3-3.  example\pubspec.yaml檔案

    flutter 專案中的檔案配置檔,除了設定基本專案資訊並可設定專案中使用到的相依類別庫或外部資源;而使用插件( Plugin) 時需要設定載入插件 (Plguin) 的檔案名稱與路徑在使用插件 (Plugin) 專案的pubspec.yaml。

name: flutter_plugin_example
description: Demonstrates how to use the flutter_plugin plugin.

publish_to: 'none'

environment:
  sdk: ">=2.15.1 <3.0.0"

dependencies:
  flutter:
    sdk: flutter

  flutter_plugin:   
    path: ../
 
  cupertino_icons: ^1.0.2

dev_dependencies:
  flutter_test:
    sdk: flutter
  flutter_lints: ^1.0.0

flutter:
  uses-material-design: true

    3-4.  example\.packages檔案

    flutter 專案中設定相依類別庫檔案路徑的組態檔,建立專案的預設檔案路徑為 flutter_plugin_example:lib/ 而此檔案是在執行"flutter pub get"指令後根據 pubspec.yaml中的內容產生出來,設定引用類別庫格式為【路徑別名:實際路徑】。

async:file:///D:/flutter_windows_2.8.1-stable/flutter/.pub-cache/hosted/pub.dartlang.org/async-2.8.2/lib/
boolean_selector:file:///D:/flutter_windows_2.8.1-stable/flutter/.pub-cache/hosted/pub.dartlang.org/boolean_selector-2.1.0/lib/
characters:file:///D:/flutter_windows_2.8.1-stable/flutter/.pub-cache/hosted/pub.dartlang.org/characters-1.2.0/lib/
charcode:file:///D:/flutter_windows_2.8.1-stable/flutter/.pub-cache/hosted/pub.dartlang.org/charcode-1.3.1/lib/
clock:file:///D:/flutter_windows_2.8.1-stable/flutter/.pub-cache/hosted/pub.dartlang.org/clock-1.1.0/lib/
collection:file:///D:/flutter_windows_2.8.1-stable/flutter/.pub-cache/hosted/pub.dartlang.org/collection-1.15.0/lib/
cupertino_icons:file:///D:/flutter_windows_2.8.1-stable/flutter/.pub-cache/hosted/pub.dartlang.org/cupertino_icons-1.0.4/lib/
fake_async:file:///D:/flutter_windows_2.8.1-stable/flutter/.pub-cache/hosted/pub.dartlang.org/fake_async-1.2.0/lib/
flutter:file:///D:/flutter_windows_2.8.1-stable/flutter/packages/flutter/lib/
flutter_lints:file:///D:/flutter_windows_2.8.1-stable/flutter/.pub-cache/hosted/pub.dartlang.org/flutter_lints-1.0.4/lib/
flutter_plugin:../lib/
flutter_test:file:///D:/flutter_windows_2.8.1-stable/flutter/packages/flutter_test/lib/
flutter_web_plugins:file:///D:/flutter_windows_2.8.1-stable/flutter/packages/flutter_web_plugins/lib/
js:file:///D:/flutter_windows_2.8.1-stable/flutter/.pub-cache/hosted/pub.dartlang.org/js-0.6.3/lib/
lints:file:///D:/flutter_windows_2.8.1-stable/flutter/.pub-cache/hosted/pub.dartlang.org/lints-1.0.1/lib/
matcher:file:///D:/flutter_windows_2.8.1-stable/flutter/.pub-cache/hosted/pub.dartlang.org/matcher-0.12.11/lib/
meta:file:///D:/flutter_windows_2.8.1-stable/flutter/.pub-cache/hosted/pub.dartlang.org/meta-1.7.0/lib/
path:file:///D:/flutter_windows_2.8.1-stable/flutter/.pub-cache/hosted/pub.dartlang.org/path-1.8.0/lib/
sky_engine:file:///D:/flutter_windows_2.8.1-stable/flutter/bin/cache/pkg/sky_engine/lib/
source_span:file:///D:/flutter_windows_2.8.1-stable/flutter/.pub-cache/hosted/pub.dartlang.org/source_span-1.8.1/lib/
stack_trace:file:///D:/flutter_windows_2.8.1-stable/flutter/.pub-cache/hosted/pub.dartlang.org/stack_trace-1.10.0/lib/
stream_channel:file:///D:/flutter_windows_2.8.1-stable/flutter/.pub-cache/hosted/pub.dartlang.org/stream_channel-2.1.0/lib/
string_scanner:file:///D:/flutter_windows_2.8.1-stable/flutter/.pub-cache/hosted/pub.dartlang.org/string_scanner-1.1.0/lib/
term_glyph:file:///D:/flutter_windows_2.8.1-stable/flutter/.pub-cache/hosted/pub.dartlang.org/term_glyph-1.2.0/lib/
test_api:file:///D:/flutter_windows_2.8.1-stable/flutter/.pub-cache/hosted/pub.dartlang.org/test_api-0.4.3/lib/
typed_data:file:///D:/flutter_windows_2.8.1-stable/flutter/.pub-cache/hosted/pub.dartlang.org/typed_data-1.3.0/lib/
vector_math:file:///D:/flutter_windows_2.8.1-stable/flutter/.pub-cache/hosted/pub.dartlang.org/vector_math-2.1.1/lib/
flutter_plugin_example:lib/


4.  執行各平台Flutter 偵錯自訂包(Package)

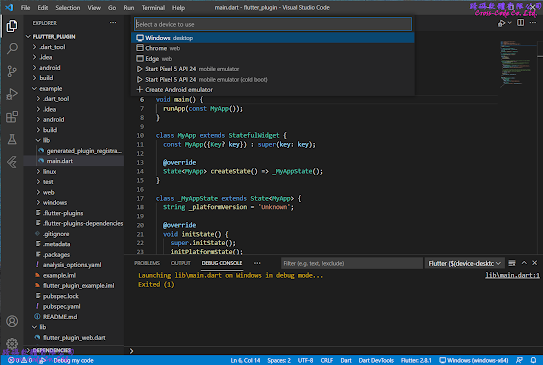
  點選右下角No Devices項目後切換至要執行偵錯的平台並執行 Run -> Start Debugging (F5) 進行偵錯

 4-1.  Windows Desktop


    4-2.  Chrome Web


 4-3.  Linux APP (Ubuntu)


 4-4.  Android APP