Flutter 的模組 (Module) 專案範例提供建立模組(Module)的專案架構,此專案將Flutter的程式打包成模組並使用 Flutter Engine API 啟動並維持 FlutterActivity 或 FlutterFragment的獨立 Flutter 環境讓Android 或 iOS 的應用程式使用。
1. 建立新的Flutter專案
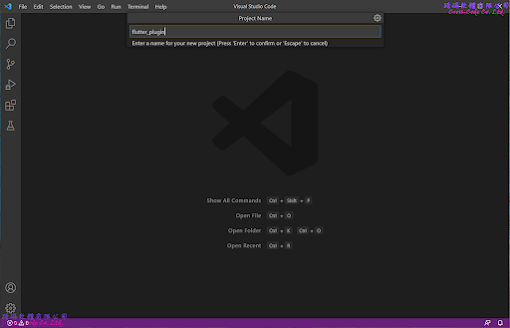
1-1. 開啟命令介面


1-2. 選擇建立插件(Plugin) 專案類型

1-3. 輸入專案名稱

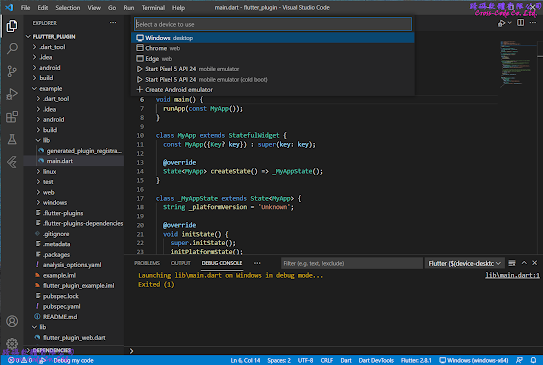
2. Flutter 預設模組專案的檔案架構
在選擇建立新的模組專案後會自動產生相關的檔案及目錄,主要的檔案如下:
2-1. lib 目錄
主要存放開發程式碼的目錄,而此範例中只提供一個簡單的範例程式檔案
1. main.dart
此程式只是一個最基本的Material App的應用程式,只有顯示文字與浮動按鍵兩個互動介面。
import 'package:flutter/material.dart';

void main() => runApp(const MyApp());

class MyApp extends StatelessWidget {
  const MyApp({Key? key}) : super(key: key);
  @override
  Widget build(BuildContext context) {
    return MaterialApp(
      title: 'Flutter Demo',
      theme: ThemeData(
        primarySwatch: Colors.blue,
      ),
      home: const MyHomePage(title: 'Flutter Demo Home Page'),
    );
  }
}

class MyHomePage extends StatefulWidget {
  const MyHomePage({Key? key, required this.title}) : super(key: key);
  final String title;

  @override
  State<MyHomePage> createState() => _MyHomePageState();
}

class _MyHomePageState extends State<MyHomePage> {
  int _counter = 0;
  void _incrementCounter() {
    setState(() {
  _counter++;
    });
  }

  @override
  Widget build(BuildContext context) {
    return Scaffold(
      appBar: AppBar(
        title: Text(widget.title),
      ),
      body: Center(
        child: Column(
          mainAxisAlignment: MainAxisAlignment.center,
          children: <Widget>[
            const Text(
              'You have pushed the button this many times:',
            ),
            Text(
              '$_counter',
              style: Theme.of(context).textTheme.headline4,
            ),
          ],
        ),
      ),
      floatingActionButton: FloatingActionButton(
        onPressed: _incrementCounter,
        tooltip: 'Increment',
        child: const Icon(Icons.add),
      ),
    );
  }
} 

2-2. test 目錄
主要存放使用Flutter中WidgetTester的測試程序對指定Widget物件進行互動驗證程式,此範例專案提供一個測試範例:
1. widget_test.dart
測試自訂MaterialApp在建立時介面是否包含有0的字串和沒有1的字串,若不是則會在執行時產生例外,若是則觸發 add icon 的tap並最後確認其介面是否包含有1的字串和沒有0的字串,若不是則會在執行時產生例外。
import 'package:flutter/material.dart';
import 'package:flutter_test/flutter_test.dart';
import 'package:flutter_application/main.dart';

void main() {

  testWidgets('Counter increments smoke test', (WidgetTester tester) async {
    // Build our app and trigger a frame.
    await tester.pumpWidget(const MyApp());

    // Verify that our counter starts at 0.
    expect(find.text('0'), findsOneWidget);
    expect(find.text('1'), findsNothing);

    // Tap the '+' icon and trigger a frame.
    await tester.tap(find.byIcon(Icons.add));
    await tester.pump();

    // Verify that our counter has incremented.
    expect(find.text('0'), findsNothing);
    expect(find.text('1'), findsOneWidget);
  });
}

2-3. .android 目錄
主要存放編譯 android 專案所需要的檔案,而與其他類型的Flutter 範例專案不同的部份在於將應用程式與載入模組的程式分開成兩個不同目錄(app, Flutter)且各自包含專屬的 AndroidManifest.xml 以便於可以共同編譯成 apk 檔案直接在模擬器、實機上執行或單獨編譯成 aar 檔案提供給其他android 專案載入使用。


2-4. pubspec.yaml檔案
Flutter 專案中的檔案配置檔,除了設定基本專案資訊並可設定專案中 使用到的相依類別庫或外部資源,而模組 (Module) 專案需要另外設定專門的相關參數。
name: flutter_module
description: A new flutter module project.

environment:
  sdk: ">=2.15.1 <3.0.0"

dependencies:
  flutter:
    sdk: flutter

  cupertino_icons: ^1.0.2

dev_dependencies:
  flutter_test:
    sdk: flutter
  flutter_lints: ^1.0.0

flutter:
  uses-material-design: true

module:
  androidX: true
  androidPackage: com.example.flutter_module
  iosBundleIdentifier: com.example.flutterModule
2-5. .packages檔案
Flutter 專案中設定相依類別庫檔案路徑的組態檔,建立專案的預設檔案路徑為 flutter_module:lib/ 而此檔案是在執行"flutter pub get"指令後根據 pubspec.yaml中的內容產生出來,設定引用類別庫格式為【路徑別名:實際路徑】。
async:file:///D:/flutter_windows_2.8.1-stable/flutter/.pub-cache/hosted/pub.dartlang.org/async-2.8.2/lib/
boolean_selector:file:///D:/flutter_windows_2.8.1-stable/flutter/.pub-cache/hosted/pub.dartlang.org/boolean_selector-2.1.0/lib/
characters:file:///D:/flutter_windows_2.8.1-stable/flutter/.pub-cache/hosted/pub.dartlang.org/characters-1.2.0/lib/
charcode:file:///D:/flutter_windows_2.8.1-stable/flutter/.pub-cache/hosted/pub.dartlang.org/charcode-1.3.1/lib/
clock:file:///D:/flutter_windows_2.8.1-stable/flutter/.pub-cache/hosted/pub.dartlang.org/clock-1.1.0/lib/
collection:file:///D:/flutter_windows_2.8.1-stable/flutter/.pub-cache/hosted/pub.dartlang.org/collection-1.15.0/lib/
cupertino_icons:file:///D:/flutter_windows_2.8.1-stable/flutter/.pub-cache/hosted/pub.dartlang.org/cupertino_icons-1.0.4/lib/
fake_async:file:///D:/flutter_windows_2.8.1-stable/flutter/.pub-cache/hosted/pub.dartlang.org/fake_async-1.2.0/lib/
flutter:file:///D:/flutter_windows_2.8.1-stable/flutter/packages/flutter/lib/
flutter_lints:file:///D:/flutter_windows_2.8.1-stable/flutter/.pub-cache/hosted/pub.dartlang.org/flutter_lints-1.0.4/lib/
flutter_test:file:///D:/flutter_windows_2.8.1-stable/flutter/packages/flutter_test/lib/
lints:file:///D:/flutter_windows_2.8.1-stable/flutter/.pub-cache/hosted/pub.dartlang.org/lints-1.0.1/lib/
matcher:file:///D:/flutter_windows_2.8.1-stable/flutter/.pub-cache/hosted/pub.dartlang.org/matcher-0.12.11/lib/
meta:file:///D:/flutter_windows_2.8.1-stable/flutter/.pub-cache/hosted/pub.dartlang.org/meta-1.7.0/lib/
path:file:///D:/flutter_windows_2.8.1-stable/flutter/.pub-cache/hosted/pub.dartlang.org/path-1.8.0/lib/
sky_engine:file:///D:/flutter_windows_2.8.1-stable/flutter/bin/cache/pkg/sky_engine/lib/
source_span:file:///D:/flutter_windows_2.8.1-stable/flutter/.pub-cache/hosted/pub.dartlang.org/source_span-1.8.1/lib/
stack_trace:file:///D:/flutter_windows_2.8.1-stable/flutter/.pub-cache/hosted/pub.dartlang.org/stack_trace-1.10.0/lib/
stream_channel:file:///D:/flutter_windows_2.8.1-stable/flutter/.pub-cache/hosted/pub.dartlang.org/stream_channel-2.1.0/lib/
string_scanner:file:///D:/flutter_windows_2.8.1-stable/flutter/.pub-cache/hosted/pub.dartlang.org/string_scanner-1.1.0/lib/
term_glyph:file:///D:/flutter_windows_2.8.1-stable/flutter/.pub-cache/hosted/pub.dartlang.org/term_glyph-1.2.0/lib/
test_api:file:///D:/flutter_windows_2.8.1-stable/flutter/.pub-cache/hosted/pub.dartlang.org/test_api-0.4.3/lib/
typed_data:file:///D:/flutter_windows_2.8.1-stable/flutter/.pub-cache/hosted/pub.dartlang.org/typed_data-1.3.0/lib/
vector_math:file:///D:/flutter_windows_2.8.1-stable/flutter/.pub-cache/hosted/pub.dartlang.org/vector_math-2.1.1/lib/
flutter_module:lib/
3. Android 專案導入Flutter模組(Module)流程
3-1. 載入Fluter模組(Module)的設定環境
1. settings.gradle
由於載入 Flutter 模組時需要使用Flutter.io相關的類別庫,因此編譯專案時需要設定下載 Flutter.io 相關類別庫的網址和載入自訂Flutter模組的路徑
dependencyResolutionManagement {

	repositoriesMode.set(RepositoriesMode.FAIL_ON_PROJECT_REPOS)

	repositories {
		google()
		mavenCentral()

		String storageUrl = System.env.FLUTTER_STORAGE_BASE_URL ?: "https://storage.googleapis.com"
		maven {
			url 'C:/Users/yuanj/Desktop/flutter_module/build/host/outputs/repo'
		}
		maven {
			url "$storageUrl/download.flutter.io"
		}

		jcenter() // Warning: this repository is going to shut down soon
	}
}

rootProject.name = "My Application"
include ':app'
2. app\build.gradle
Flutter將模組打包成AAR檔案時會產生三種 ( debug, release, profile ) 對應不同建置類型而載入的AAR檔案,因此需要在檔案中指定各建置類型對應的AAR檔案並且新增 profile 建置類型並使用 'iniWith' 屬性複製debug 建置類型的組態設定。


plugins {
  id 'com.android.application'
}

android {
  compileSdk 32

  defaultConfig {
    applicationId "com.example.myapplication"
    minSdk 24
    targetSdk 32
    versionCode 1
    versionName "1.0"

    testInstrumentationRunner "androidx.test.runner.AndroidJUnitRunner"
  }

  buildTypes {
    release {
      minifyEnabled false
      proguardFiles getDefaultProguardFile('proguard-android-optimize.txt'), 'proguard-rules.pro'
    }

    profile {
      initWith debug
    }
  }

  compileOptions {
    sourceCompatibility JavaVersion.VERSION_1_8
    targetCompatibility JavaVersion.VERSION_1_8
  }
}

dependencies {
  implementation 'androidx.appcompat:appcompat:1.2.0'
  implementation 'com.google.android.material:material:1.3.0'
  implementation 'androidx.constraintlayout:constraintlayout:2.0.4'
  testImplementation 'junit:junit:4.+'
  androidTestImplementation 'androidx.test.ext:junit:1.1.2'
  androidTestImplementation 'androidx.test.espresso:espresso-core:3.3.0'

  debugImplementation 'com.example.flutter_module:flutter_debug:1.0'
  profileImplementation 'com.example.flutter_module:flutter_profile:1.0'
  releaseImplementation 'com.example.flutter_module:flutter_release:1.0'
}
3. 載入 flutter 相關的資料庫
針對相關環境設定完成後,執行Sync Project With Files的動作才會真正的載入相關的類別庫並可在Gradle視窗中檢視相關的類別庫是否正確的載入至專案中。


3-2. 設定 AndroidManifest.xml
Flutter 提供 FlutterActivity 用於 Android 應用程式中顯示 Flutter 的使用者介面。 和其他的 Activity 相同,要使用 FlutterActivity 必須在Android 專案的AndroidMifest. xml 文件中的application標簽中進行註冊。
<?xml version="1.0" encoding="utf-8"?>
<manifest xmlns:android="http://schemas.android.com/apk/res/android"
  xmlns:tools="http://schemas.android.com/tools"
  package="com.example.myapplication">
  <application
    android:allowBackup="true"
    android:icon="@mipmap/ic_launcher"
    android:label="@string/app_name"
    android:roundIcon="@mipmap/ic_launcher_round"
    android:supportsRtl="true"
    android:theme="@style/Theme.MyApplication">

    <activity
      android:name="io.flutter.embedding.android.FlutterActivity"
      android:configChanges="orientation|keyboardHidden|keyboard|screenSize|locale|layoutDirection|fontScale|screenLayout|density|uiMode"
      android:hardwareAccelerated="true"
      android:windowSoftInputMode="adjustResize"
    />

    <activity
      android:name=".MainActivity"
      android:exported="true"
      tools:ignore="MissingClass">
      <intent-filter>
        <action android:name="android.intent.action.MAIN" />
        <category android:name="android.intent.category.LAUNCHER" />
      </intent-filter>
    </activity>
  </application>
</manifest>
3-3. 載入 Flutter 模組
1. 使用createDefaultIntent的方式建立FlutterActivity
此方式是以預設模組的載入點為 main 函式且預設路由("/")的方式載入 。
import io.flutter.embedding.android.FlutterActivity;
Button deflaunchbtn = null;
protected void LaunchFlutterActivityByDefaultIntent(){
  deflaunchbtn = (Button)findViewById(R.id.deflaunchbtn);
  deflaunchbtn.setOnClickListener(new View.OnClickListener() {
    @Override
    public void onClick(View view) {
      startActivity(
        FlutterActivity.createDefaultIntent(getApplicationContext()));
    }
  });
}
2. 使用withNewEngine 方式建立FlutterActivity
若要自訂路由名稱則可以使用工廠方法 (Factory Method) withNewEngine 函式和將自訂路由名稱作為參數的方式建立FlutterActivity 類別 ,此方式會在FlutterActivity內部建立一個FlutterEngine實例,但會有一個明顯的初始化等待時間。
import io.flutter.embedding.android.FlutterActivity;
Button engrutbtn= null;
protected void LaunchFlutterActivityByEngineWithRoute(){
  engrutbtn = (Button)findViewById(R.id.engrutbtn);
  engrutbtn.setOnClickListener(new View.OnClickListener() {
    @Override
    public void onClick(View view) {
      startActivity(
        FlutterActivity
          .withNewEngine()
          .initialRoute("/flutter_module_route")
          .build(getApplicationContext())
      );
    }
  });
}
3. 使用 FlutterEngine 方式建立FlutterActivity
建立 FlutterActivity 時會同時建立自已的 FlutterEngine,但 FlutterEngine 的建置時間會導致載入時出現明顯延遲行為。因此若要減少延遲行為則必須在建立FlutterActivity前先初始化FlutterEngine並在適合的地方實例化FlutterEngine。
import io.flutter.embedding.android.FlutterActivity;
Button engchbtn= null;
protected void LaunchFlutterActivityByEngineCacheWithRoute(){
  engchbtn = (Button) findViewById(R.id.engchbtn);

  flutterEngine = new FlutterEngine(this);
  flutterEngine.getNavigationChannel().setInitialRoute("/flutter_module_route");
  flutterEngine.getDartExecutor().executeDartEntrypoint(
    DartExecutor.DartEntrypoint.createDefault()
  );
  FlutterEngineCache
        .getInstance()
        .put("flutter_module_engine_id", flutterEngine);

  engchbtn.setOnClickListener(new View.OnClickListener() {
    @Override
    public void onClick(View v) {
      startActivity(
        FlutterActivity
          .withCachedEngine("flutter_module_engine_id")
          .build(getApplicationContext())
        );
    }
  });
}
4. 執行Android應用程式